 Use snap point [1]
Support on this page via E-Mail...
This chapter deals with basic functions in DDS-CAD. Model handling, project, screen, menus, help geometry handling, project, screen, menus, help geometry.
Enter positions for points and objects on screen by pointing and clicking the left mouse button. This is, however, dependent of which process you have started . in other words, dependant on the situation.
Use snap point [1]
Snap points is a display on screen where it is possible to hook on with new fixing points entered via the left mouse button after you have started a drawing process. Basically the program will indicate known points – such as the midpoint of a line, end point of a line, cutting point between two lines, etc. – even if they have not been entered previously in the drawing – as a red circle with a cross inside.
 If you, for instance, are working with a dynamic line, this is displayed from the last position. The movable end is in the crosshair/cursor. A dynamic line is also the basis for many drawing processes – depending on the current application. The drawing process in the DDS-CAD is supported and simplified by means of various help functions, for instance concerning snap point – see the help menus.
If you do not want to be hooked on to other points with the snap point all the time, but want to position freely or just via grids in the drawing, turn off Use snap point permanently via the button.
When Use snap point is active and you want to position temporarily without being hooked on to other points, hold down the [Alt] key, and the positions are entered without being hooked on to other points.
When Use snap point is not active, the positions are entered without being hooked on to other points. However, you can temporarily in the drawing process get snap points by holding down the [Shift] key and enter positions that are hooked on to other points.
 Use grid point [2]
Grid is a net consisting of horizontal and vertical lines, where the cutting point forms so-called grid point. When a grid is activated, the mobility of the cursor gets limited in the drawing (see mode 2 in the description of mode). The cursor displays the grid points as snap points. If this is disturbing in the drawing process, the grid can be turned off.
 Use smart snap point [3]
Smart snap point is intelligent snap points including various functions in the individual application. Used to calculate automatic fixing point.
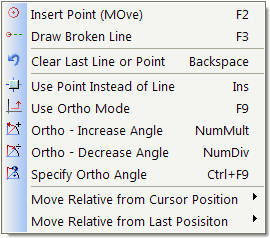
Snap point When a dynamic line is activated to enter positions on screen, or an object is dynamic on screen, the crosshair centre is marked with a snap point – i.e. a red circle. A pop-up menu is also available via the right mouse button. Via the options here, the position can be calculated from the cursor position on screen, or from the last entered position. The Pop-up menu gives us these two options:

 Positioning via DL (Dynamic Line)
 To generate a dynamic variable line to indicate a new position in the drawing visually. The position is fixed to the drawing by clicking the left mouse button, or [Enter]. This option can be activated separately if you want to draw lines and positions separately – or the option is activated via another menu to enter outlines, draw wall, cables, bridges, channels etc.
When the command is activated, a number of functions can be activated via the pop-up menu. These are mainly self-explaining and displays in addition the context commands to the right. The arrow keys on your keyboard can be activated to specify the exact length in the arrow direction. The key [Backspace] deletes the last level and returns one level.
It is possible to draw in "ortho" (locked angle) mode, activated via the pop-up menu. When "ortho" is active, the dynamic line will move gradually in angle when moving the crosshair. This angle can be bisected by using the key for division (/). To double the angle, use the key for multiplication (*). The basis is 22,5 degrees.
Zooming is possible when dynamic line is active.

Via the buttons Use snap point and Use grid points this type of points can be de-activated on screen, in order not to disturb the positioning on screen. This can also be disconnected temporarily by holding down the [Alt] key when pointing and positioning on screen. When you let go of the key, the snap point and grid point will be active again.
When an object such as JavaScript/symbol/figure is to be positioned, help functions are available in the pop-up menu.
When a dynamic line/object is activated to enter positions on screen, a help menu is also available by clicking the right mouse button. Via the options here, the position can be calculated from the cursor position on screen, or from the last entered position. Snap point is displayed as a red circle.
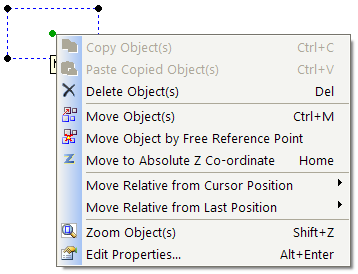
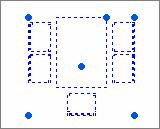
| Grips are displayed on screen as a dense, little blue circle. Each object can have several grips, and the point is used to move one or several objects at the same time. |
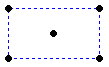
The object must be marked before the grips become visible.
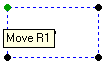
Point at the grip you want to be the fixing point when moving the object. By clicking the left mouse button the object is detached from the drawing, and you can use options via snap point etc. to fix the object again. The object can also be deleted, copied etc. Click the right mouse button first, to get a help menu displaying the options.
During the drawing process it can be useful to get help lines etc. to find the correct construction and positioning. These are displayed in the drawing as green, and temporary help lines will be orange. Help lines, -circles and –points can remain in the drawing, or they can be deleted by pressing a key – select from the menu. These help objects can be deleted one by one or all in one operation via menu and button row. Help objects cannot be edited/changed/moved. Then new ones are entered.
 Activate Help geometry via a separate button in the toolbox. A click on the right mouse button will then give you the following options:
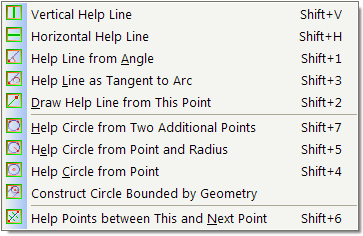
Via this menu you can draw help lines and circles. The lines are endlessly long and drawn in green.
When you have activated help geometry and point on screen, you will see that when the cursor are moved over lines, the lines turn orange, so that you can check which line is active. The same goes for circles and arcs. By pointing on a line/circle to make it turn orange and then click the right mouse button, the pop-up menu will be available as usual.
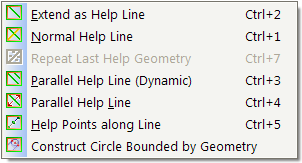
Holding down the Ctrl key will allow access to additional functionality, such as Parallel Help Lines, once you have selected an existing drawing element:
Cancel and end the help geometry = [Esc]
 All help geometry can be deleted at the same time via the button Delete help geometry.
< Previous Section - Next Chapter >