Before starting with this chapter, you must have been through chapter 6 Room database and chapter 11 Heat requirement calculation. You should also be acquainted with the concept of Heating Facilities.
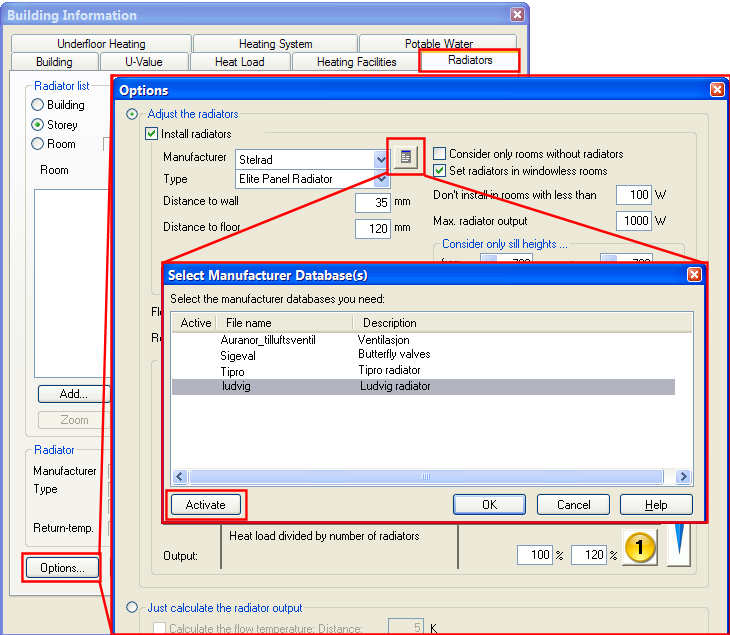
DDS-CAD Radiator calculation is based on calculated power requirement from DDS-CAD Heat requirement calculation. If the power requirement is known for each room in your building, DDS-CAD will search through the supplier databases to get the radiator most suitable for your criteria. You will set priority for which parameters that are most important, either power, height, length or depth of the radiators. The radiator power in the DDS-CAD database is based on 90/70 temperature. Enter which temperature area you want to use for your system, and DDS-CAD will calculate the real power. Since DDS-CAD Radiator calculation is depending on supplier databases, we are going to use Ludvig radiators in this chapter. Start with getting the Ludvig radiator database. This is done from the Options dialog on the Radiators tab of the building dialog -> Additional product database.

Additional product database. Find Ludvig radiators and press the button Activate.
You will find the Radiator calculation in the same spot as all the other calculations - in the DDS-CAD Building dialog ![]() First, check the tab "Heating Facilities" to set the amount of the heat load to be satisfied by radiator heating.
First, check the tab "Heating Facilities" to set the amount of the heat load to be satisfied by radiator heating.
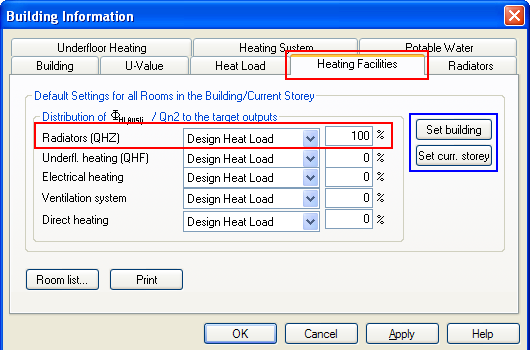
The tab "Heating Facilities". We set the radiators to 100%. Make sure to set the distribution for either the entire building or the entire storey.
It is assumed that the room has now been defined, and that the heat requirement calculation has been performed. Select the tab "Radiators" on the building dialog.
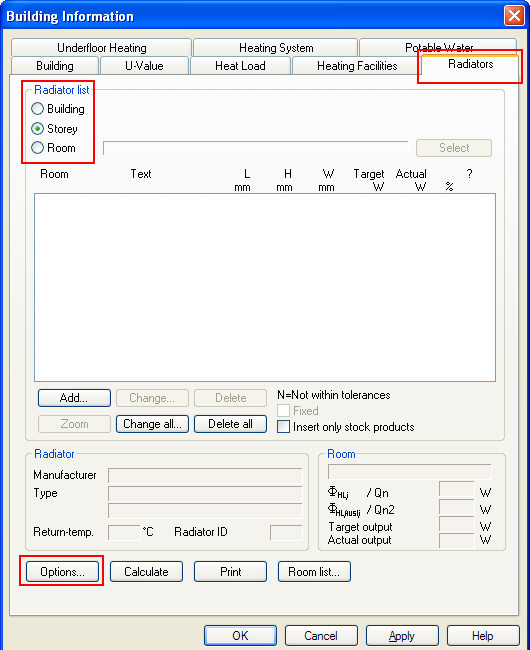
Dialog box for Radiators. From the Radiator list, indicate if you want to position the radiators for the entire building, the entire storey or just for one room. Then press the button "Options"
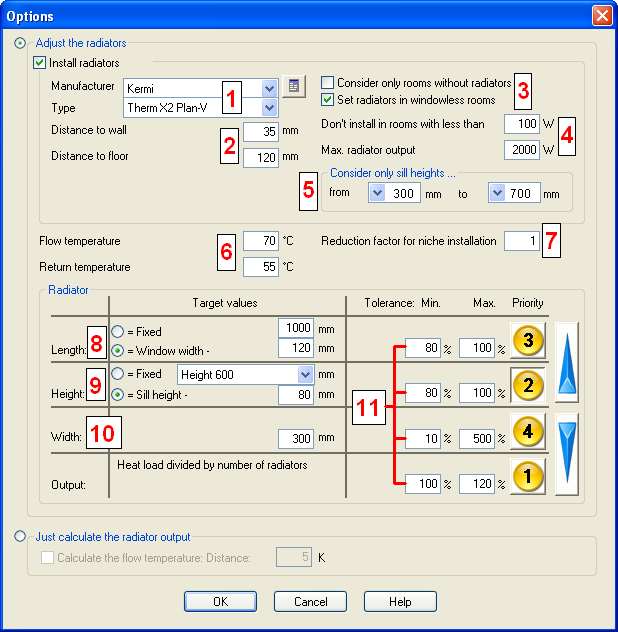
Options for radiator calculation.
|
1 |
Manufacturer and Type: Select from "drop down" menu |
|
2 |
Distance to wall: DDS-CAD Radiator calculation will position the radiators for you, preferably under windows. You set the distance from rear edge radiator to wall. Distance to floor: Distance from lower edge radiator to upper edge floor. |
|
3 |
Install only in room without radiator: If a room has already got one or several radiators, DDS-CAD Radiator calculation will ignore this room. Install also i room without window: If this is a room with power requirement but without window, DDS-CAD Radiator calculation will install radiators in this room as well. The radiators will then be positioned in the middle of the room. |
|
4 |
Do not install in rooms with less than: Room with less power requirement than this field will not be assigned radiators. Max radiator power: Here you enter max radiator power you want to use. If you enter max power of 650 Watt, and a room has a power requirement of 1000 Watt, this room will get two radiators. |
|
5 |
Consider only barrier height...DDS-CAD controls the barrier height for all windows at any time. You can decide if you want to calculate the radiators under all windows, or just one window with an entered barrier height. |
|
6 |
Supply and Return temp: Enter the required temperature for your system. DDS-CAD Radiator calculation will automatically calculate the real power for the radiators from your temperature. |
|
7 |
Factor for niche: Additional factor if required. If you have a reason for oversize the radiators in your system, the factor can be entered here. 1 = no oversize (100%), 2=double size (200%) etc... |
|
8 |
Length: The max length of the radiator. You can either lock them to a fixed length, or you can let the DDS-CAD Radiator calculation decide the length based on the width of the window. Ex: A window is 900 mm wide. You enter max radiator length to Window width - 100 mm = 800 mm |
|
9 |
Height: Same rules as for Length. |
|
10 |
Depth: Enter max depth for the radiator |
|
11 |
Tolerance and priority: Tolerance for lurching when DDS-CAD Radiator calculation is to search for suggested radiators. Ex:. Power has a tolerance of 100% to 120%. In a room with power requirement of 100 Watt, radiators with power between 100 Watt and 120 Watt will be acknowledged. |
When setup is done, press the button "OK".
You will now return to the flag Radiators in the Building dialog. Press the button "Calculate" to start the DDS-CAD Radiator calculation
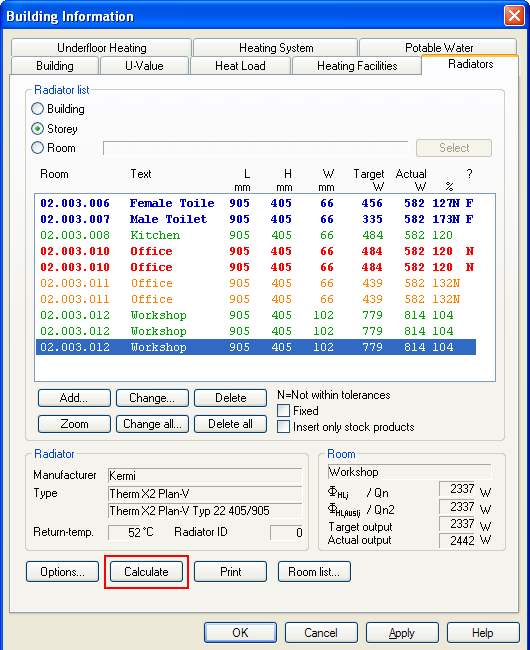
After having pressed the button "Calculate, the radiator list is filled.
Colour codes:
Green colour:The radiator is calculated and approved
Yellow colour: One or several tolerance values are beyond the limits in setup. The values beyond this limit get an N in the rear edge.
Red colour:The radiator is not calculated - this may appear if you insert a radiator manually after having done the first calculation.
Blue colour: The radiator is locked (freeze)
Explanation for columns in the radiator list
|
Room |
Room number. Numbered as : Storey . Area . Room number |
|
Text |
Room description |
|
L mm |
Radiator length |
|
H mm |
Radiator height |
|
D mm |
Radiator depth |
|
Behov W |
Power requirement for the room (divided on the number of radiators positioned in the room) |
|
Radi. W |
Calculated power for the radiator (uftratur - returtemperatur) |
|
% |
The power cover for the radiator based on the power requirement of the room. 100% means that the radiator power corresponds to the requirement for the room. 50% means that the radiator power is only half of the requirement for the room |
|
? |
N = No. The radiator is not calculated. F=Freeze, The radiator is locked |

See video how to perform a radiator calculation.

Click to see a video
If you get yellow lines telling you that one or several of the values are beyond your criteria for radiator selection, you can change this manually afterwards. On the video above you can see that one of the radiators in room no. 02.001.114 Living room has a power of 98% of the requirement.

The third radiator in the Living room has a power of 596 Watt, while 606 Watt is required. It produces 98% of the requirement and will get an N in the rear edge, as we have set the power criteria to allow values between 100% and 150%

Power criteria. Everything between 100% and 150% is allowed
There are two ways of solving this. Either go to Setup to change the criteria from 100%-150% to 95%-150% , or overrule the radiator length. As you can see from the image above, 2 of the 3 radiators in the Living room has a length = 1200 mm, while the last one - not approved - has a length of 1000 mm. The difference appeared as the window width is different in the Living room To change a radiator manually, click once on it in the radiator list, and press Edit. Run a new calculation. See video how to do this.

Click to see a video
When all radiators are within the criteria, press OK, and the radiators will be positioned under the window. As mentioned previously, rooms without windows will have the radiator positioned in the middle of the room. You can move and position it manually. You can print a report for radiator calculation if required. Select the button "Print" and select the required report setup.
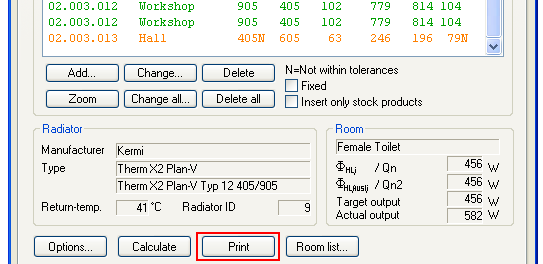
Click here to see a finished report.
< Previous Chapter - Next Chapter >